Introduction:
Wiring a light switch may seem like a daunting task for many homeowners, but with the right knowledge and guidance, it can be easily accomplished. Whether you’re looking to replace an old switch or install a new one, this comprehensive guide will walk you through the process, ensuring a safe and successful outcome. So, let’s dive in and learn how to wire a light switch like a pro!
Step 1: Gather the Necessary Tools and Equipment:
Before you begin, make sure you have the following tools and equipment handy:
- Screwdriver (flathead and/or Phillips, depending on the switch)
- Wire strippers
- Voltage tester
- Electrical tape
- Wire connectors
- Light switch (single-pole or three-way, depending on your needs)
- Electrical cables (typically black, white, and bare copper)
Step 2: Turn Off the Power:
Safety is paramount when working with electricity. Start by turning off the power to the circuit you’ll be working on. Locate the circuit breaker panel and switch off the corresponding breaker. To be extra cautious, use a voltage tester to ensure the power is truly off before proceeding.
Step 3: Remove the Old Switch (if applicable):
If you’re replacing an existing switch, carefully remove the cover plate and unscrew the switch from the electrical box. Take note of the wires connected to the switch and their respective positions, I recommend taking a picture with your phone before you disconnect any wires.
Step 4: Prepare the Wires:
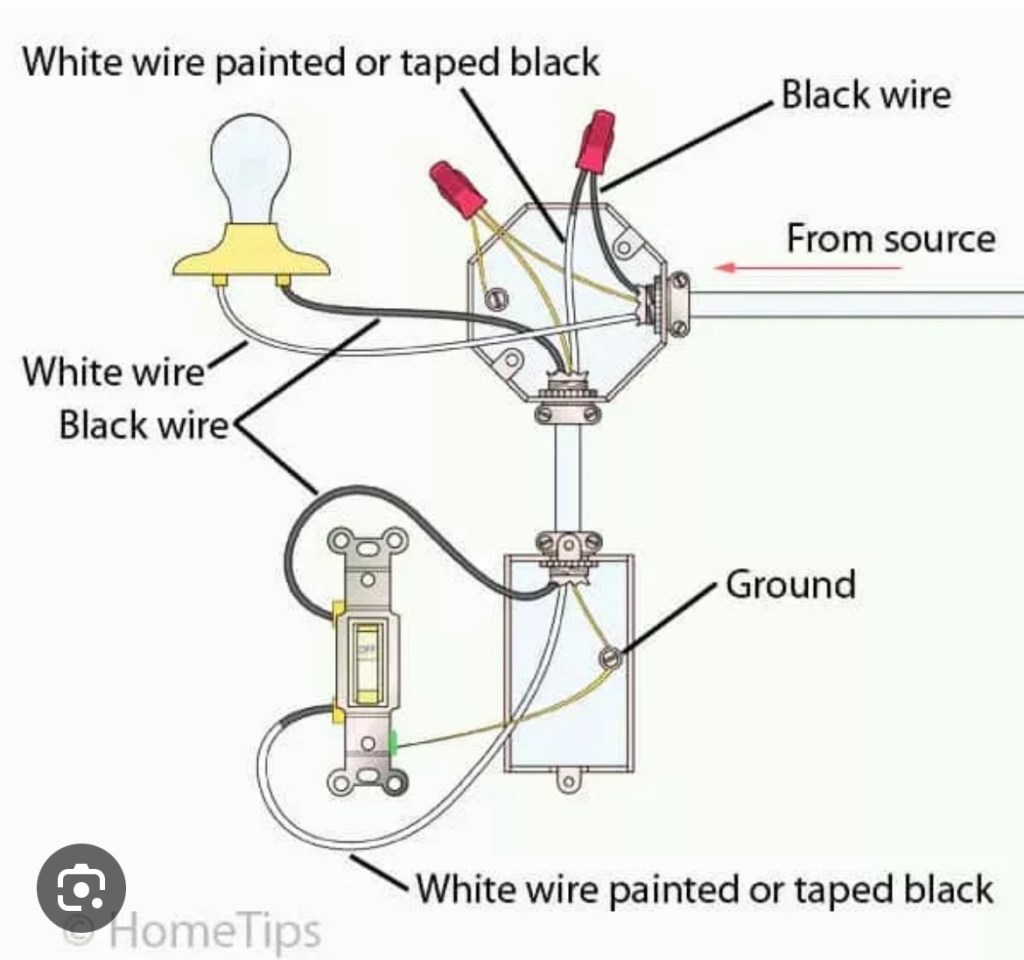
Once the old switch is removed, assess the wiring. Typically, you’ll find three wires: a black (hot) wire, a white (load) wire, and a bare copper (ground) wire. If necessary, use wire strippers to remove a small portion of insulation from each wire.
Step 5: Connect the Wires:
Start by connecting the bare copper (ground) wire to the green grounding screw on the new switch. This wire ensures safety by providing a path for electrical current in the event of a fault.
Next, connect the black (hot) wire to the brass screw terminal on the switch. If you have a single-pole switch, this is the only wire you’ll need to connect. If you have a three-way switch, there will be an additional black wire, known as the “traveler wire,” which connects to the black screw terminal on the switch.
Lastly, connect the white (load) wire to the silver screw terminal on the switch. This wire completes the circuit and allows the flow of electricity.
Step 6: Secure the Switch and Test:
Carefully tuck the connected wires back into the electrical box, ensuring they are not pinched or strained. Screw the switch into place, making sure it is securely mounted.
Once everything is in place, restore power to the circuit by flipping the breaker switch. Test the light switch by turning it on and off to confirm that it is functioning correctly. If the light doesn’t turn on, double-check the wiring connections and consult a professional if needed.
Conclusion:
Congratulations! You have successfully wired a light switch and gained a valuable skill that can come in handy for various electrical projects. Remember, safety should always be your top priority, so if you’re unsure or uncomfortable working with electricity, it’s best to seek professional assistance. With the right tools, knowledge, and a little patience, you can confidently tackle electrical projects and create a well-lit and functional space in your home. Happy wiring!

Leave a comment